


INSTALLATION
LVT GLUE DOWN FLOORING INSTALLATION INSTRUCTIONS
1. Prepare
Important Note:
Don’t installaion outdoor, bathroom area or on other high subsidence surface like carpet, …
To buy 10-15% extra material for installation backup, depend on normal or herringbone installation
To check visible defect every plank carefully before installation
To mix and install planks from several boxes to have nature look
1.1. Tools and materials
LVT flooring must be maintained at the proper temperature before, during and after installation to help minimize dimensional changes. All flooring materials, subfloors and adhesives must be kept at a constant temperature of 15°C (59°F) to 30°C (86°F) for 48 hours before, during and 48 hours after installation. After installation, the room temperature must be maintained between 13°C (55°F) and 35°C (95°F).
Materials:
LVT Flooring
Construction adhesives
Construction tools:
Construction trowel
Floor roller
Chalk roll
Level ruler
Square ruler
Paper knife
Technical cutting mat
Tape measure
Hygrometer
Protective equipment:
Safety glasses
Protective gloves
1.2. Prepare the subfloor:
General information
Subfloor must be clean, dry, level, and free of movement. Any surface imperfections must be filled and sanded. Smoothing the surface within 3/16” in a 10′ radius or 1/8” in a 6′ radius (4.8 mm within a 3.05 meter radius or 3.2 mm within a 1.83 meter radius). Remove any adhesive residue from the floor. Do not use solvent-based adhesive removers. Subfloor moisture content should be between 30-55%. Temperature between 15°C (59°F) and 30°C (86°F)
Concrete floor:
Floor surfaces must be smooth, dry and free of dust, paint, grease, solvents, asphalt-based crack sealants, oils and other materials.
The surface must be solid and hard, without flaking or crumbling.
Newly poured concrete must be completely dry and cured. Make sure the concrete is poured at least 6 weeks before installing the floor.
Surface hardeners, curing agents and other additives can cause adhesive bond failure, affecting adhesion. They must be removed by sanding or grinding.
Moisture arising from the concrete can create high alkalinity levels, hydrostatic pressure and moisture escape. These factors combined will cause serious damage to the floor and leave long-term effects. To avoid this problem, make sure that the concrete floor is installed according to the American Concrete Institute (ACI Guide 302.2).
To check the floor conditions, a calcium chloride test (ASTM F1869) and an RH test with an In-Situ Probe (ASTM F2170) must be performed. If the vapor emission /hydrostatic pressure exceeds 6 lbs (or 2.72kg) and/or RH 90%, 1 moisture-proof layer (film or adhesive coating) on concrete surface.
Wooden floor:
Screw or nail any squeaky or loose areas.
Wood panels must be securely fastened.
Repair warped edges and replace any bulging, water damaged, or peeling underlayment or paneling.
Wood subfloor panels must be at least 1” or 25mm thick and not vertically offset.
All fasteners must be flush with the subfloor panels.
Basements and raised floor foundation spaces must be dry. The distance from the ground to the underside of joists must be no less than 18” or 457mm and the total area of ventilation openings must be 1.5 % of the total area of the basement for ventilation.
For existing surfaces like quarry tile, terrazzo, ceramic tile, or poured floors (epoxy, polymeric, seamless) the following steps are crucial:
The existing floor must be:
Fully Cured and Bonded: Be completely dry and securely adhered to the concrete subfloor.
Free of Contaminants: Have all traces of solvents, petroleum derivatives, waxes, polishes, grease, grime, and oil thoroughly removed.
Dry and Neutral: Show no signs of moisture or alkalinity.
Repaired for Damage: Any cuts, cracks, gouges, dents, or other irregularities must be repaired or replaced.
Leveled for a Smooth Surface:
Low spots, holes, chips, and seams must be filled to prevent them from telegraphing through the new flooring.
Tile grout joints and textured surfaces need to be leveled with a specialized embossing leveler or a material approved by the substrate manufacturer.
In short: The existing floor surface needs to be clean, repaired, leveled, and dry before installing the new flooring.
Radiant Heat Considerations
Maximum Surface Temperature: The surface of the floor heated by the radiant system cannot exceed 85°F
New Radiant Systems – Pre-Installation: For new radiant heat systems, run the system at its highest setting for a full week (7 days) before you install the new resilient flooring. This helps dry out any leftover moisture in the concrete.
Temperature During and After Installation:
24 Hours Before: Turn off the heater or lower the floor temperature to 70°F one day before installation.
During Installation: Turn off the heater or keep the floor at 70°F during the entire installation process.
48 Hours After: Turn off the heater or maintain the 70°F for two days after installation.
Afterwards: Once you return to normal operation, make sure the floor surface temperature never goes above 85°F.
Use a Temperature Sensor: It’s recommended to use a temperature sensor embedded in the floor to monitor the heat and prevent overheating.
Note:
Leave an expansion gap about 7-10mm from wall and use molding to cover it.
Turn off the heater before, during and after installation for at least 24 hours for the best performance.
The heating temperature should not exceed 85°F, maintaining it at 80°F is the best.
Do not increase or decrease the temperature suddenly, only increase or decrease by 35°F (2°C) each time of adjusting.
2. Installation
2.1.
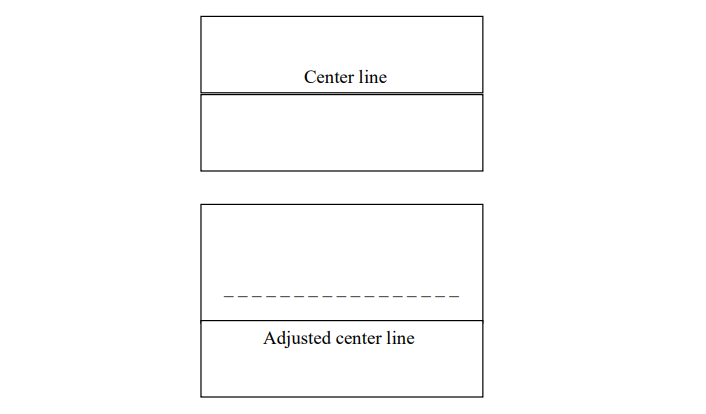
First, determine the plank installation direction. Mark the center of the floor at each end of the room and draw a chalk line between the marks to create the center line. To avoid having to cut small pieces along the walls, divide the distance from the center line to the wall by the plank width. If the remainder is less than half the plank width, adjust the center line by shifting it half a plank width in either direction.
2.2.
Apply adhesive to the floor surface and wait for the adhesive to dry completely to ensure adhesion before installing the floor (see the instructions on the packaging of the adhesive you are using for the time to wait for the adhesive to dry). Start installing the boards along the base of the wall. Complete each row (including the small panels cut at the end of the row at the base of the wall) before proceeding to install the next row. At the end points of the row, place the new board gently on the previously installed board vertically and cut the board at the point where it rests on the board below. After cutting, place the cut ends toward the wall. If you need to adjust or remove a board, use a heat gun to heat the board first.
2.3.
Do the same on the opposite side until you have tiled the entire floor of the room. At the base of the wall on this side of the room boards need to be cut to fit walls and other vertical surfaces.

Straight Cut:
Place new board directly on top of the last installed board, aligning all edges.
Use a board to measure the distance from the wall to the last installed board, place the edge of the board against the wall, and mark the new board with a pencil where it meets the measured board at the wall edge.
Next, use a square to get direction, mark the pencil line carefully, and cut the board along this line with a knife.
Install the board with the cut edge facing the wall.
Irregular cutting:
Mark new boards to fit irregular shapes such as pipes and door trims, wall edges, etc. and cut the boards along the marked lines.
2.4. Finishing
After the floor installation is completed, roll the entire floor surface with a floor roller, it is highly recommended to use at least 100 lbs or 45 kg roller.
Limit foot traffic for the first 24 hours after installation.
Replace baseboards and return furniture and appliances to the room (glue/ nail to the wall, not to flooring).
Seal all openings that may be exposed to liquid spills on the surface (e.g. toilets, showers, bathtubs, etc.) with silicone caulk.
For self-adhesive LVT flooring,
no glue is required. Measure and cut the panels in the same way as regular LVT flooring. Then peel off the backing paper at the bottom of the panel and stick it directly to the floor with the glue pre-coated on the base.
3. Repair, replace
Warming the Floor with a heat gun
Use a knife to cut the corner of the damaged floor panel. Do not cut into the subfloor below.
At the corner cut point, pull the floor panel up slowly, continue heating until floor panels peeling off.
Lift the entire floorboard up and heat the adhesive already on the subfloor and install the new floorboard.
Use a hand roller to firmly secure the new floorboard in the area that can not be reached with big roller.
4. After care
Use a soft broom to sweep the floor regularly.
For heavy furniture, use protectors under the legs.
All exterior entrances must have protective floor guards.
Carpets in the house should be cleaned regularly to avoid accumulation of dirt and sand inside.
Avoid wearing high heels or shoes with studs that can seriously damage floors.
Replace the wheels of indoor appliances (if any) with soft rubber wheels.
Prolonged exposure to direct sunlight may cause discoloration of the floorboards.
Do not drag or roll heavy furniture or equipment across the floor.
Trim nails for house pets.
Use neutral PH cleaner in stead of strong detergent.
Avoid direct sunlight.
Step 1: Measure the area of the wall prior to application with wire gauge or laser
Step 2: Mark the exact position of the first panel on the wall.
Step 3: Use the first grub screw to fix the first panel on the wall
Step 4: Put the hinged lock on the first panel, use a hatch or a nail gun to lock the hatch and the panel to the wall.
Step 5: Install the next panel into the first panel using tongue-and-groove interlocking system.
Step 6: Repeat the 5th step until the wall is completed
Step 7: Bend grooved sheet of the wall panel when install on the wall ‘s edge, corner and fix with adhesive
Follow the same steps for installation of plaster walls, iron frames or wooden frames.
Installation of AnPro plastic wall panel on concrete and brick wall.
How to install wall panels on non plastered walls by using steel frames.